


production Strider 24

plywood Romany 34

lightweight 14ft Zeta mainhull

Strike 15 trimaran at speed

28ft Skoota in British Columbia

10ft 2 sheet ply Duo dinghy
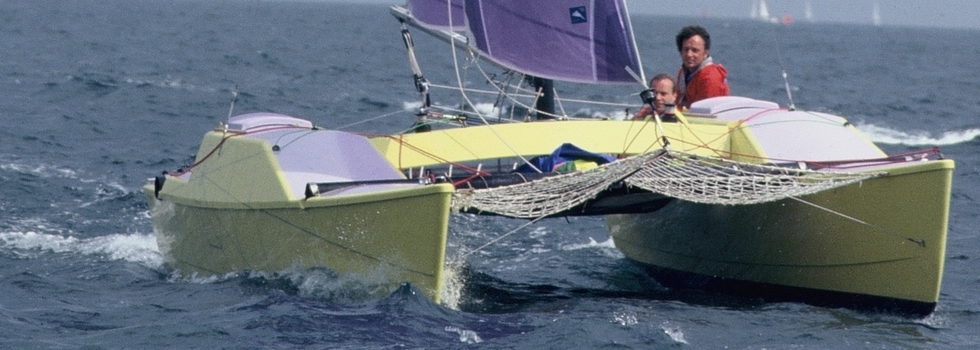
24ft Strider sailing fast

36ft Mirage open deck catamaran
Updates to Plans
Strike 16, 18
Strike 18 Materials List
6mm gaboon ply (8ft x 4ft sheets) 10 sheets
2in x 1in 25m
11/2in x 1in 40m
1in x 1in 10m
5in x 1in 3m or laminate from 2in x 1in
3in x 2in kingpost 1.3m
Epoxy resin 10kgs min 200g glass cloth 2kgs min
Screws 3/4in counter sunk stainless steel 1000 (or use barbed ring nails)
Filler etc as required
Scrap timber for frame No allowance for waste Timber sizes nominal planed all round (PAR) use softwood, eg Douglas, fir, Sitka spruce etc
Note, the manual photo sheets show the prototype being built. So there are some differences between the drawings and the photos. If in doubt follow the drawings. For example on Manual page 1 you can see notches for keel stringers in the bulkheads. On Sheet 4 you can see they were later filled in. These keel stringers are unnecessary. However if you leave the boat on a shingle beach and dry out regularly then beaching strips on the outside of the hull are a good idea for extra protection. Best to fit them after sheathing the main hull
The outboard bracket sketch is HERE, see photo below. A 2hp min outboard is recommended, 3hp max. We use a 4 stroke Suzuki 2.5hp. Highly recommended, as it is the lightest small outboard available. Max speed is 6.5 knots.

The beam bolt plate is shown below.

The trampoline fastening is shown below

Note pocket at front end. Inner edge has a sleeve with 18mm (3/4in) dia aluminium tube inside. Lash this to the hull with lashings at about 300mm (12in) spacing. Either use eyelets or simply drill through the timber. Inner edge tramp should line up with beam bolts.
The removable cabin is made after completing the boat and is made to suit your boat. See sketch HERE and typical hatch below. This version gives more headroom below, but is awkward to get into when sailing to windward. A sliding hatch is a better option in that case. The "aft deck" of the cabin should be 200mm high max. It can be lower, but room inside reduces however it makes it easier to cross the deck when tacking. Adjust panels as necessary
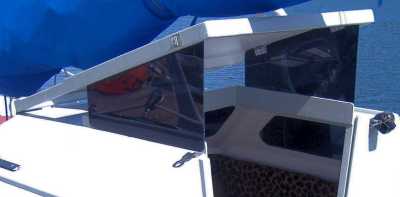
To simplify raising the mast, chainplates can be added to the windscreen corners. Note these may need to be removable if cabin is fitted. Top hole for shackle to line up with mast step pivot.

Embarrassing note: I initially fitted mine in the wrong place, later they were moved forward, see photo below.
A method of reefing is recommended. There are two options. First, and recommended, is to have reef points installed about 1m (3ft) above the boom or as convenient. The second is simply to "roller reef" the mainsail by rolling it round the boom. Note this will probably mean lowering the sail completely first, but is obviously the easiest method if you rarely sail in bad weather. A roller reefing/furling jib is also recommended.
If the cabin is not fitted you will need a simple boom tent (approx 8ft x 6ft) to stop rain water filling the cockpit if the boat is left afloat.

To attach the aft corners we screwed small eyelets to the outriggers

It maybe that we have sailed our own Strike too much in the rain, but I have now decided that a longer windscreen is a more practical, comfortable arrangement for those not using the removable cabin. See sketch HERE. Of course the removable cabin can still be fitted, but the dimensions will have to be modified to suit the longer windscreen.
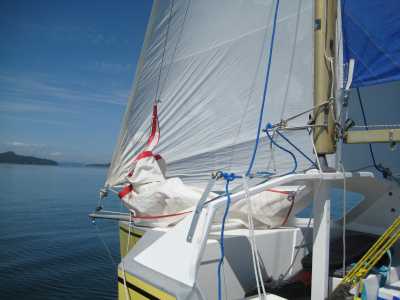
The photo below shows wire luffed screecher, mainsail downhaul and kicking strap details. Note mast rotation spanner can be forward or aft of mast. Blue lines are spanner rotation lines to eyelets on window joints, while vertical blue lines are temporary stays (left slack when sailing) to assist mast raising. These have now been changed to 2mm wires. Kicking strap only needs to be tight when offwind (otherwise mast rotation is difficult).

The optional screecher is for experienced sailors only. Luff 7.5m, leech 6.5m, foot 4.6m, area 15sqm. All sizes are approx, depends on own mast. It is fitted to a bowsprit which is two 11/2in (37mm) dia aluminium tubes 1.8m total length. Fit each side of forestay fitting, so tubes are slightly bent - which helps hold them stiff. Attached on the inner end by a horizontal through bolt which goes through a large eyelet bolted to a deck pad. Note blue rubber pad to stop chafe. Outer end is bolted together with a 2in x 6mm x 4in long (50mm x 6mm x 100mm) aluminium plate which takes dolphin striker (below) and screecher furling drum (above)

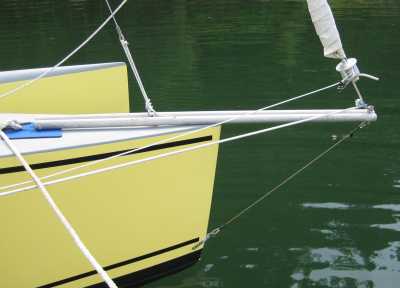
3mm (1/8in) wire dolphin striker is taken to a chainplate bolted through solid stem just above WL. Screecher furling drum at bottom and swivel at top to suit a beach cat screecher. Halyard take off at mast head.

Screecher halyard is pulled to masthead. Then lower end is tightened by rope through block at bowsprit end to convenient cleat by windscreen (cleat shown on right with thick rope). Furling line to small cleat as required (above beam). Screecher is sheeted to small swivel blocks initially lashed mid way along aft beam. Adjust position to suit own rig after trial sails. (Because the boat uses a variety of beach cats for rig and outriggers you have to expect a degree of experimentation to get the boat optimised.)
NOTE: If sailing in Category C (coastal) rather than Cat D (sheltered water) then "waterstays" are recommended to help stiffen the beams. If using Quattro hulls then make both the fore and aft beams from the same section and fit both vertically to maximise stiffness. See sketch HERE. Note, you may be able to use the existing dolphin striker fitting on the front beams.
Many people simply cut the beach cat beams in half rather than buying new beams. This means the boat is a bit narrower overall than drawn. That's OK for big hull beach cats, like Prindle 16 or Nacra, and for those with a standard rig. However if you use a bigger than standard rig and/or have small outriggers then a wider overall beam is desirable.
For those who want better windward performance, particularly when using a boardless beach cat, I have drawn a main hull daggerboard and centreboard options. Note, this can be retrofitted if desired. Click HERE for a daggerboard drawing
If you sail regularly in shallow water you may prefer a main hull centreboard. See HERE for a pdf basic drawing
The bottom of Bulkhead 1 needs trimming off square to suit the keel stringer. It probably isn't that clear from the drawings, but the building manual sheet 2, top photo, shows it well.
You can reduce the beam mounting extensions as shown in the photos below. Note: When drilling the pivot holes ensure that they are the same distance above the WL (or wing base) +/- 30mm or the beams will not fold up easily. There is an updated Sheet 18 HERE

Note bevelled wood block above beam bracket that helps support beam when folded up

We started with a rope mainsheet horse. Simple, but awkward and irritating. So we have now changed to the proper horse shown below. All made from scrap 4in x 2in, as always. Note simple car adjustment. Track height will depend on your own tiller. Ensure it can tack properly!


The simplest mast supports are as below. We made ours from scrap 4in x 2in timber, soon to be remade properly, but even so they would be neater in aluminium!

The advantage of this mainsheet system is that the aft mast support slots neatly in position (note the locating blocks glued to the transom step) with no lashing required.

Mast supports should result in mast resting approx 100mm above mast step

Note: The aft support should be wider than the diamond spreaders to simplify moving the mast. The roller helps. This support comes under high twisting load as you push the mast to/fro so bolt it together securely. The forward support is less loaded. Again note supports which stop support moving. Also note vital carpeting! Alternatively (depending in part on towcar used and local trailering laws) you can fit a pad on top of the mast step and use that as the forward support (we use a fender). Saves weight and time.

We fitted U bolts through the cockpit sides (pads on the inside of course) to take the hold down straps, see below.
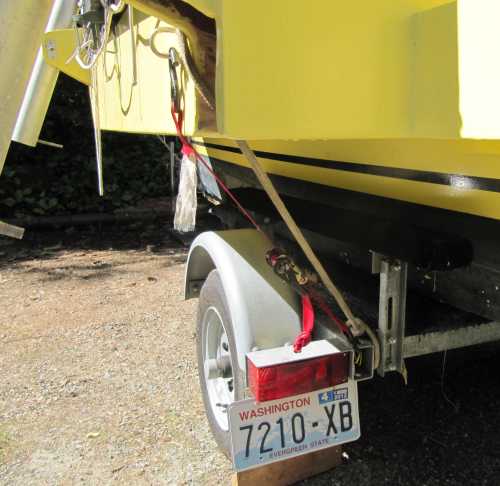
The white rope holds the (std) outrigger in place, obviously there is another on the other side of the trailer for the port outrigger. We also have a security strap holding the forward end of the outriggers together.

The hull securing straps are cut to length and marked, one port and std aft, one forward (not strictly necessary) plus the trailer winch which also holds down the front mast support. The mast is held down by two straps, again cut to length and marked. It all speeds assembly/disassembly.
Although we have had no problems with our standard trailer (even though we live up a very steep bumpy track and launch from a rough shingle beach) I recommend getting a trailer with as wide a wheel base as possible. That will give a more reassuring ride, especially on main roads busy with large vehicles.
Although it is feasible to raise the mast in one go, as shown on the video, you can use a temporary supporting pole to give yourself a breather. See photo below showing our pole, made, as always, from 4in x 2in and about 1.5m long. Note "U" shaped notch to hold mast securely. Pole slots between mainsheet track and transom step

To make it easier to tack the jib and prevent snarl-ups I remove the mast raising stabilising wires and clip them to a eyelet on the front of the windscreen (hidden inside the tube in the photo below). Then I cut a 600mm (24in) piece of 37mm dia (11/2in) water pipe and slid it over the wires as shown in the photo below. Works a treat

One idea that I should have thought of are the wing lockers as seen on the Strike built by "Nealfromtexas"

A 100+kg (20 stone, 240lbs+) man was helping us rig our boat on shore. He jumped onto the cockpit wing and cracked the joints. So I suggest adding an underwing stringer running full length between the beams. You can download a pdf of the revised drawing HERE